Beginning with Converted Data
Many new customers have switched to Church Windows from another software program. In some cases, our conversion staff can convert your existing Membership data into Church Windows for you. Conversion prices vary based on the format of your old data.
Note:
For questions about converting data from another program into
Church Windows, please call
800.533.5227 or email cwdataconversion@gmail.com.
If you have sent your data in to us for conversion, you should receive a letter from our conversion staff that includes instructions on how to install your new data as well as extra information concerning your specific situation. Please read this information carefully as conversion results vary not only by the original format, but also from Church to Church.
Data is processed in the order that ensures the smoothest, most accurate conversion possible. New conversion customers often notice that their family numbers do not flow alphabetically. This is not something to be concerned about, since you can get any reports and lists in alphabetical order at any time, and you may view your data in alphabetical order Using the Find Function.
Please remember that data conversion is not an exact science. Because different software programs use different kinds of data formats, there will always be some "cleaning up" for you to do once you have your data in Church Windows. During a data conversion, there is a pattern to how data comes over into Church Windows format. You can usually recognize the pattern in the first few families and know that the rest of your families will be similar. To follow are some suggestions on how to check and correct your data, but please be sure to read the earlier sections of this manual as well. It is important to be familiar with Church Windows fields and how they are used within the program.
Tools to help review converted data
 Print Selected Data and Review
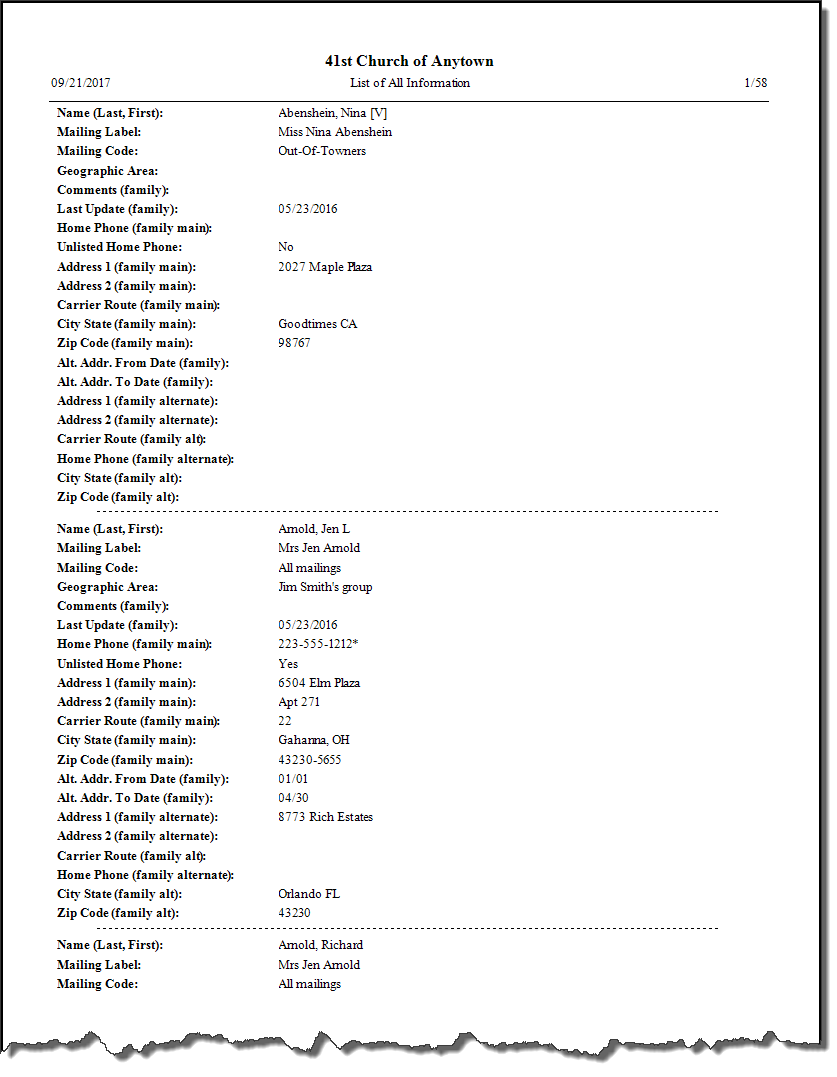
It might be a good idea to print an All Information report for a handful of people and then check the data, looking for patterns.
- From The Initial Portal of Church Windows choose Membership
- Click People
- Click Find
- Then click Find again in the pop-up window without selecting any criteria
This will bring all individual records to
The Find Grid, sorted in alphabetical order. Typically, this report will be a bit more helpful if we Group & Sort the Find Grid Records primarily by Family #, then by Individual # within that, so individuals will be together with their other family members and in the order in which they appear in the family.
To sort the people and fields on the Grid in such a way:
- Click the Columns and Sorting button at the top of the Grid.
- The Group & Sort tab allows you to set the sort order using up to three fields.
- The columns tab determine what information will be displayed on the Grid.
- The list on the right contains the fields that appear on the Grid.
- The list on the left contains all the available fields.
- Find the field(s) you would like to view either double-click, or click and click the
 right button to bring that field to the list on the right.
 - Now do the same for any additional fields. (You can use the SHIFT and CTRL keys to add or remove multiple fields simultaneously.)
- Click OK to return to the Grid.
To print out the information:
- At the top of the Grid, click the Print Grid button.
- Make any necessary changes to the options.
- Click Print. The report will compile on the Print Preview screen.
The first 3 or 4 pages of this report will probably be enough information for you to get an idea of how your data converted. Take a look at the information on this report, paying special attention to these fields: Mailing Label, Envelope #, Status Code, Family Relation, Include on Directory, Directory/Report Order, and Mailing Code. Typically, you can recognize patterns by looking at these first few families.
When you are checking the Include on Directory and the
Directory/Report Order field, keep in mind that during a conversion, usually everyone gets an entry here. There may be cases when family members get the wrong code in the conversion, and the codes may need to be reassigned.
Make Changes
There are quite a few tools available in
Church Windows that will help you make any necessary changes to your data in
Individual Record Fields and
Family Record Fields. If you find something that needs to be changed in many records in the same way, then Mass Edit may be helpful (see below or, for a specific example, see
Mass Editing Area Codes). There may also be situations where individual records have been entered in the wrong family. In this case, then the Transfer Individual(s) function would be helpful.
Mass Edit Converted Data
Mass Edit will edit the information in one field in the same way on many records at once, saving the time of viewing and editing each record individually. To accomplish this change, all you need to do is to tell Church Windows which field you would like to change, what information you would like to take out or replace (if any), and what the new information should be.
To have Church Windows find every record during its search, then enter the Mass Edit from The People File. For Church Windows to search through and change information in only a certain group of records, then perform a Find to get this certain group displayed in The Find Grid, and then click Mass Edit from the Grid. For an even more select group, then highlight certain records on the Grid, and only those records will be changed in the Mass Edit.
List Field Codes
First, check the definitions for all of the codes in any Field Types that contain converted data. On anyone's record on the People screen (click
Membership, People), one-by-one, check all of your List fields on both
The Family Record and
The Individual Record (especially
Directory/Report Order, Mailing Code, Status, Family Relation, etc.). This will bring up that field's available codes and definitions. Some definitions might be "unknown" or something similar, but you can change them to the correct definition. To change them, click Edit Items, click the definition(s) you would like to edit, and make your changes. Click OK when you have finished editing, then click Close to close that list box.
Transfer Individual to Another Family
There may be times when an individual record should be moved from one family to another.
- The individuals whose records you would like to transfer must be on the screen in The People File.
- Then click Transfer Individual.
- The Transfer Individual(s) screen will appear.
- On the left side, select the individual that needs to be moved to another family.
- On the right, select Existing Family and choose which Family, or New Family. Then, either type in the new Family information or paste in the Current Family Information.
- Then click OK to make the transfer final. All of the information in this individual's record will move with them to the new family, including attendance, visits, and contributions.
Printing Reports for Your Members to Update
Once you have your data cleaned up a bit, you might want to print out all of the information you have in Church Windows for each person so that they can check for accuracy and add any missing information. We have a prepared report to help you do this efficiently.
All Information
To print a report for each person / family that lists all existing information in their record and leaves blanks for them to fill in missing information:
- From The Initial Portal of Church Windows choose Membership.
- Click Reports/Export in the Button Bar at the top of the screen.
- Click Reports & Labels.
- Then choose Reports / Directory / Export.
- The Step 1 — Select who should appear on the report screen will appear.
- Clicking → Next without entering any Membership criteria to get all people in the database, or click the People Selection Criteria to enter Membership search selections (and/or the Giving / Pledging Selection Criteria, etc.) to limit whose records you will print.
- On the Sort tab choose Family # for Sort Field 1 to list everyone in the family sequentially or choose Name for alphabetical order. When you're finished, click the → Next button.
- On the Step 2 — Select the report layout/format screen, select All Information
- We recommend using a template which includes Family Information so that each person can confirm their correct family and mailing address.
- If you’d like to include Alternate Addresses on these reports, add the Alternate Address field in the Column Selector, as well as any other fields you'd like to add.
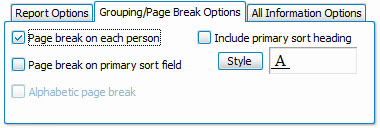
- In order to have the system print the reports on separate pages so you can give each family their own report, click the Grouping / Page Break Options tab at the top right. Place a checkmark in the Page break on each person box:
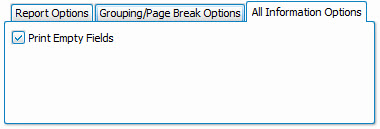
- In the All Information Options tab at the top right corner, mark the box to Print Empty Fields:
- Once you have made all of your selections, click Print to view a Print Preview and then proceed in sending the file to your printer. You can also Export most reports and/or Send via Email as a file to be used outside of Church Windows.
- Keep in mind that since this report will include everyone in The People File, then it may take a while to compile.
- It will include a separate report for each person, printing all existing information about each person, and leaving blanks for the people to fill in any missing information.
- Distribute these reports to your parishioners, and update your
Church Windows system accordingly with the new, updated information they give you!